Upload products to your store with AutoDS: full guide to all methods
Learn every way to add products to your store, from Marketplace to CSV uploads
AutoDS makes it simple to add products to your store, whether you want to search and import directly from the platform or upload items with product URLs, IDs, or CSV files.
This guide walks you through all the available methods so you can choose the one that best fits your workflow.
Benefits
-
Upload products quickly using multiple methods.
-
Save time with bulk imports.
-
Keep your uploads organized with tags and templates.
-
Customize settings for pricing, shipping, and monitoring.
Quick Jump
Choose the correct store
If you manage more than one store, always select the store where products should be imported.
-
Click the store name on the top-left of your AutoDS dashboard.

-
Select the correct store.
-
Click Next.
👉 Learn More: How to choose the right selling channel and add a store to AutoDS
⚠️ Important: Always make sure the correct store is selected before importing, so your products are added to the right place.
Search and import from AutoDS Marketplace
The AutoDS Marketplace is a built-in hub for sourcing products from top suppliers.
-
Open the Marketplace tab.
-
Use the search bar or apply filters to find products.
-
Click Import Draft.
-
The product appears in your Drafts page, where you can edit and publish it.

👉 Learn More: AutoDS Marketplace Feature - Full Overview
Private suppliers in the Marketplace
AutoDS Private Suppliers are part of the Marketplace. To upload products from them, look for the Private Supplier logo ![]() .
.

When browsing products, the preview card gives you a quick overview:

| Field | Description |
|---|---|
| Supplier/company name | The supplier’s name. |
| Branding logo | Shows that the supplier offers a branding service. 👉 Learn More: Branding Service on AutoDS |
| Product title | Title of the product. |
| Item cost | Product cost. If you see a price range, the product has variations with different prices. |
| Retail price | Recommended price for you to offer buyers (you can set it higher or lower). |
| Shipping time | Estimated delivery time. |
If the preview information is enough, click Import Product to send it directly to your Drafts.
If you want to see more details (supplier’s policy, shipping terms, returns, etc.), click on the product to open the product page.
👉 Learn More: AutoDS Marketplace Feature - Full Overview
Upload single product
- Selected store — here you will see the store you chose to upload to. If you want to change the store, click on the little pencil and choose another one.
- URL or Product ID - put the ID or URL of the product you wish to upload
- Supplier source- choose the supplier you upload the product from
- Region - Select the warehouse region the product originates from.
- Publish to store- the product will be uploaded to your store immediately
- Edit now (Quick)- choose to edit the product before you upload it. If you choose this option you will be forwarded to the edit page.

💡 Tip: Add products to Drafts first to review and optimize the details before publishing them to your store.
⚠️Important:
Make sure your Ship To region is correct.
Always confirm that the region selected in AutoDS matches the one on the supplier site. You can set this under Settings → Supplier Settings → General → Ship to Country.
Here’s how Deals appear on AliExpress and how to adjust the Ship to option to match the one you set in AutoDS:

💡 Tip: Matching the Ship To settings ensures accurate pricing, shipping times, and product availability when importing.
💡 Tip: Start with a small batch of products to test your store’s automation settings before importing in bulk.
Bulk import
Perfect for large inventories, AutoDS offers two bulk import options.
Option 1: Multiple URLs or IDs
-
Click Add Products → Multiple Products.
-
Paste each URL or ID on a new line.
-
Verify supplier and warehouse details.
-
Click +Add Draft.

Option 2: CSV file
-
Click Add Products → Multiple Products.
-
Select Upload CSV File.
-
(Optional) Download the example file to prepare your sheet.
-
Upload your CSV and follow prompts to match fields.
The file must be a CSV file with the following fields as column titles:
BuyId (Required)
Title (Optional)
Price (Optional)
-
Products will appear in the Drafts page.

Import CSV from other platforms
If you are migrating from another monitoring software:
-
Contact your previous software’s support team.
-
Request an export of your listings in CSV format.
-
Edit the file to match AutoDS formatting (BuyID required, Title and Price optional).
If you are migrating from eBay:
-
Download a report of your active listings from eBay.
-
Use the file to import your listings directly into AutoDS.
👉 Learn More: How to Export Listings from your eBay store
⚠️ Important: If the CSV file is not formatted correctly (for example, missing the BuyId column), the upload will fail.
Products will appear on the Drafts page once the upload is complete.
💡 Tip:
-
Keep each bulk upload under 500 products for optimal system performance and faster processing.
-
You can upload to multiple stores simultaneously by selecting more than one store when starting the import.
Upload settings explained
After choosing multiple products, you’ll see options before completing the upload:

-
Add as Draft → edit later before publishing.
👉 Learn More: How to Edit a Single Draft? -
Publish Now → send products directly to your store. The product's settings will be according to your lister and pricing preferences.
- Schedule for Later → set a specific date and time for the upload.
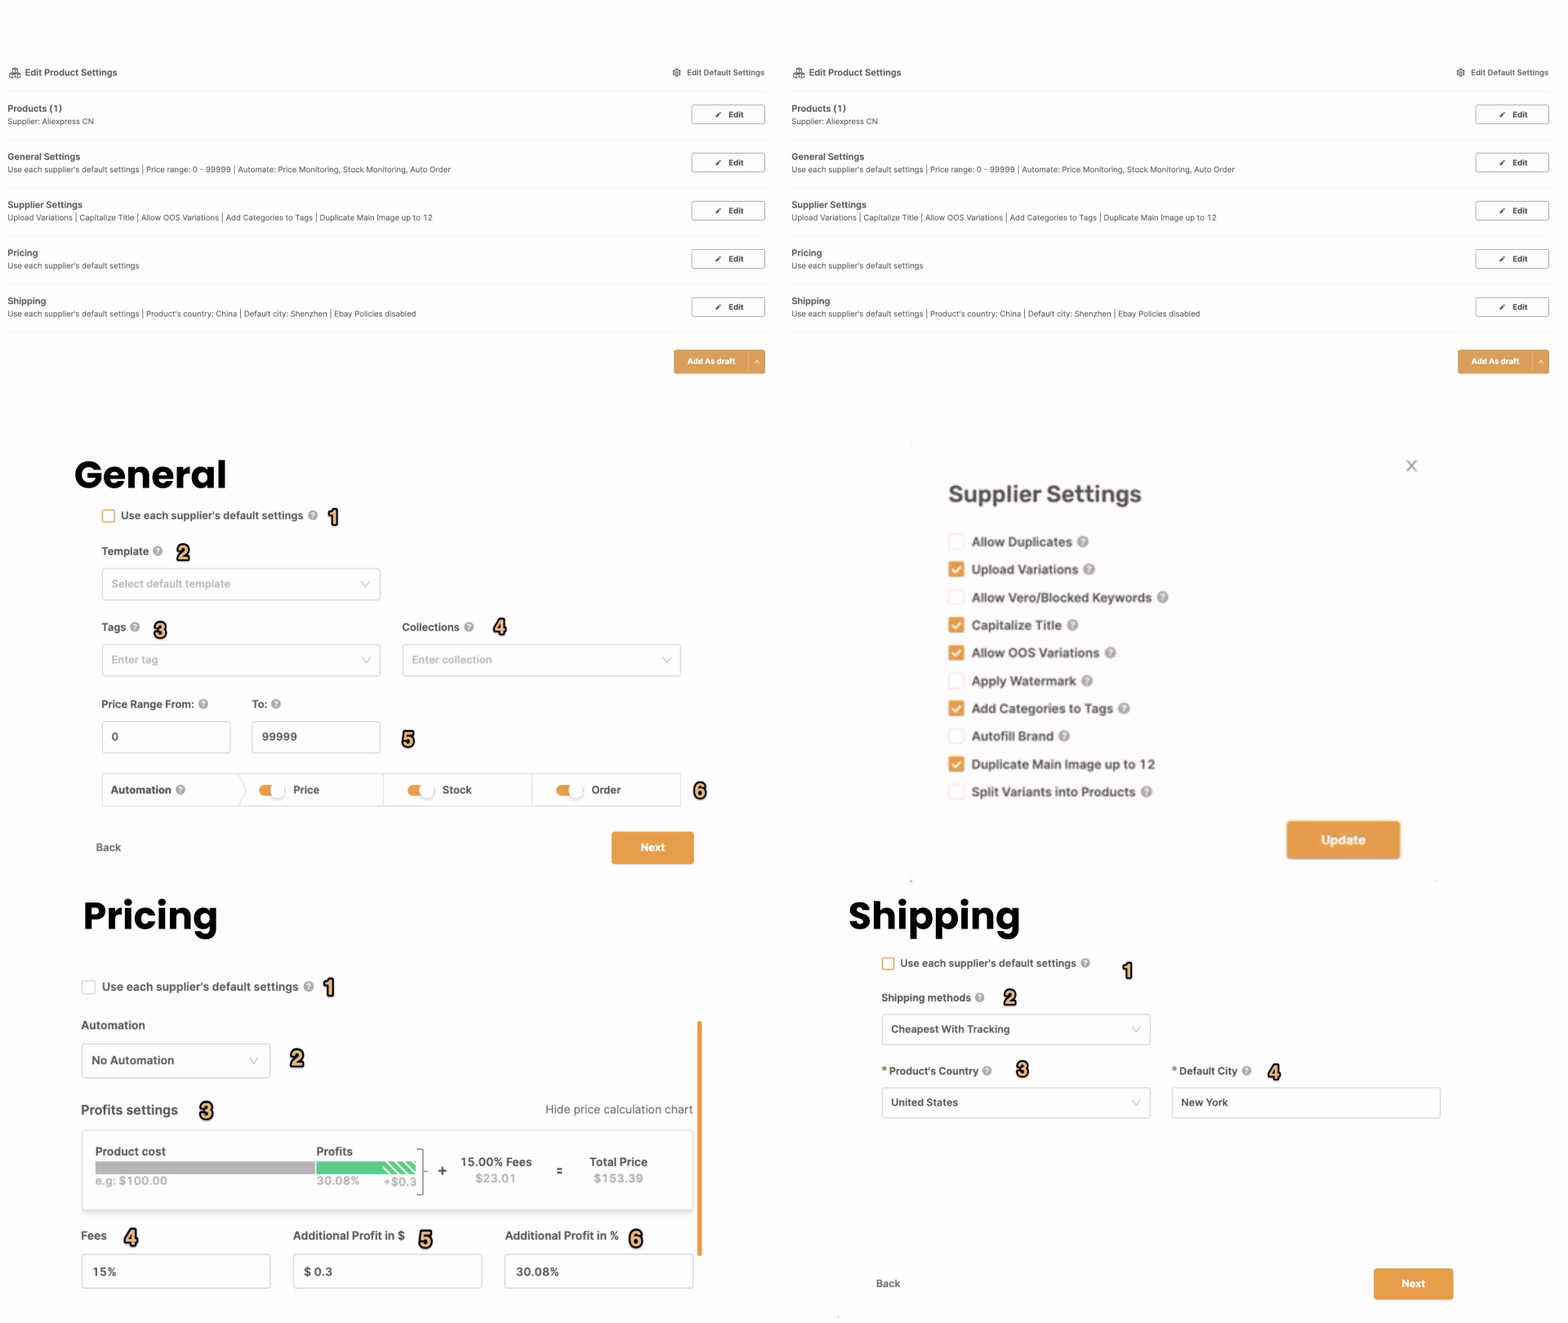
- Edit Upload settings → adjust General, Pricing, or Shipping & Policies before scheduling.
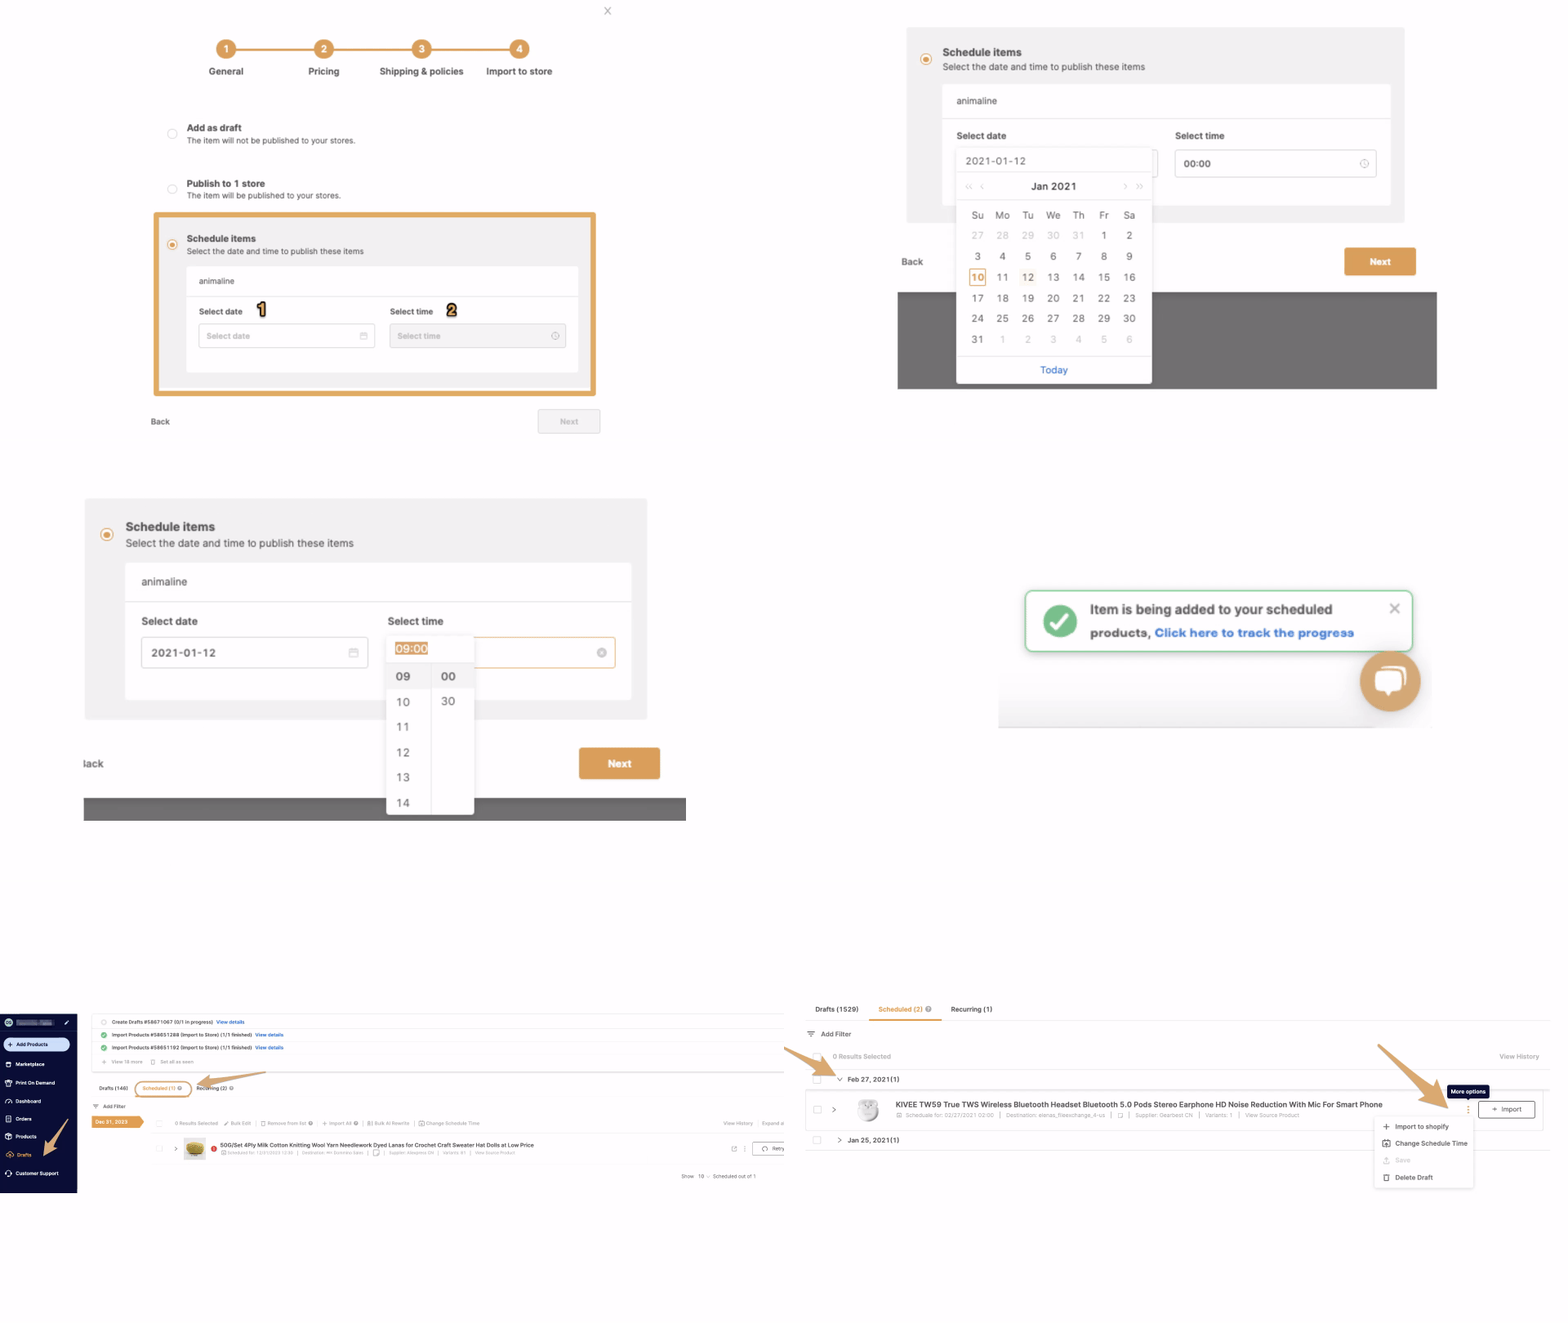
Schedule for Later
- Choose Schedule for Later on the upload options screen to open the scheduling page.
- Pick the day you want the upload to run (you can even choose today).
- Select the time from the dropdown. You can schedule items in 30-minute intervals.
-
Click Next. The item will be added to your Scheduled uploads and a confirmation notification will appear.
-
View & manage scheduled uploads
-
Click the blue link in the confirmation notification or go to Drafts → Scheduled.
-
Items are listed by scheduled date.
-
Click the arrow to expand and edit details (title, images, quantity, etc.).
-
Click ⋮ to change the scheduled date, import immediately, or delete the schedule.
-
-
⚠️ Important:
The time you select is based on your own time zone. If you have a VA (Virtual Assistant) working for you, they will see the scheduled time according to their time zone. Make sure you convert the time correctly to avoid confusion.
💡 Tip: Scheduling helps you better plan your uploads around campaigns, peak hours, or seasonal events.

Edit Upload settings
You can also adjust advanced settings across tabs:
| Stage | Details |
|---|---|
| Products | Clicking on Edit allows you to add or remove products from your bulk upload. You can also change the supplier or region for all selected products before continuing. |
| General |
|
| Supplier |
Configure advanced supplier-related options such as Allow duplicates, Upload variations, and other behavior rules. If Upload Variations is unchecked, the product will be uploaded as a single-variant product, and variations cannot be added later. |
| Pricing |
|
| Shipping |
|

Note:
Reviewing advanced settings helps you control every detail of your uploads—pricing, monitoring, and shipping preferences—ensuring accuracy and consistency across your store.
Using default settings applies your saved preferences and locks the fields for faster upload.
One-click import with AutoDS Chrome Extension
When browsing supplier sites, use the AutoDS Helper Chrome Extension to import products instantly with one click.
👉 Learn More: AutoDS Helper (Chrome Extension): One-click product importer for Dropshipping
How to add products to Facebook Marketplace
⚠️ Important: AutoDS cannot sync your existing Facebook Marketplace listings. If you already have listings on Facebook, you will need to re-upload them through AutoDS.
Once you have products saved on your Drafts page, you can upload them to your Facebook Marketplace account using the AutoDS Chrome Extension.
Steps to add products:
-
Go to your Facebook Marketplace account and click Create New Listing.
-
In the dropdown menu, select a product from your Drafts and click Paste Info from AutoDS.
-
The extension will automatically fill in the title, description, images, and price.
-
Review the details, edit if necessary, and click Next. You can also add a brand name and SKU (optional).
-
Insert the shipping details:
-
Set Delivery Method to Shipping Only.
-
Under Shipping option, select Use your own shipping label.
-
Turn on Free Shipping for Buyers.
-
-
(Optional) Allow buyers to negotiate a price equal to or above the minimum you set.
-
(Optional) Choose up to 20 Facebook groups to list your item in (recommended).
-
Scroll down and click Publish. A confirmation notification will appear.
-
Go back to your AutoDS account and check the Products page — the item will move automatically from Drafts to Products.

📘 Check out our FREE Facebook Marketplace course
How to add products to TikTok Shop
⚠️ Important notes before uploading:
-
TikTok approval – Products uploaded via AutoDS require approval from TikTok before they go live in your store. Always monitor your TikTok Shop for notifications about the approval process.
-
Default warehouse – All products uploaded through AutoDS will be placed in your default TikTok warehouse.
-
Product certifications – TikTok may require specific certifications depending on the product category. Once you upload a certificate for one product, it will automatically apply to all products in the same category.
👉 Check the list of restricted and non-restricted items here. -
Size chart – For certain product types, TikTok requires a size chart. You can upload the chart image from the Image tab when editing your product.
Steps to manage certifications:
-
Go to Products → Product Certification → Manage in your TikTok Seller account.
-
Upload the required certifications for the relevant categories.
-
Once applied, the certification will cover all products in the same category.

💡 Tip: To avoid delays, upload products that don’t require certification whenever possible.
